Standheizung kann verrußen?
Hallo,
mein 🙂 hat mir neulich in einem Gespräch gesagt, das ich die Standheizung, wenn ich sie morgens kurz vor der Fahrt nur ca. 10 min. laufen lasse, dass sie dann verrußen kann, ich solle sie doch weiterlaufen lassen.
Wie käme es zu einer solchen Verrußung?
Wie lange sollte man die SH noch laufen lassen?
Führt das nicht zu höherem Benzinverbrauch?
Da ich wegen eines anderem Grund dort war, habe ich dann leider nicht weiter nachgefragt.
Gruß Thomas
Beste Antwort im Thema
Hello all,
This is my experience how to install the "Modul Zuheizer Standheizung Deaktivieren"
1. Introduction
First of all please excuse me for not posting in German. It is possible for me to read and understand but difficult to write. It would be also for you difficult to read if I did 😉
"A picture can express more than thousand words", so I uploaded some to illustrate this project.
I am very happy 🙂 to install the protection against unwanted starts of the auxiliary heater (Zuheizer). Many thanks to Bronken and his companions Matthias S. and Frank S. for the good work and explanation: http://www.bronken.de/zuheizer/
My Passat was made in april 2008, 2.0 TDI with motor code CBAB and has a red information display. It has an original auxiliary heater that I build in myself, with a B7/Golf 6 clima control unit:
-------------------------------------------------------------------------
Address 18: Aux. Heat Labels: None
Part No: 1K0 815 007 BH
Component: Standheizer 042 4404
Revision: 00042000 Serial number: 09011075000000
Coding: 0001012
Shop #: WSC 12345 123 56423
No fault code found.
-------------------------------------------------------------------------
Address 08: Auto HVAC (J255) Labels: 5K0-907-044.clb
Part No SW: 5K0 907 044 AM HW: 5K0 907 044 AM
Component: Climatronic 130 0305
Revision: 00002001
Coding: 0000000000
Shop #: WSC 00000 000 00000
ASAM Dataset: EV_Climatronic A01001
ROD: EV_Climatronic_VW46.rod
VCID: 76E9F801C9DC1C9
No fault code found.
-------------------------------------------------------------------------
For those who are not familiar with embed software and electronics I like share my experiences and I hope it will help.
Be carefull: To protect against ESD it is advised to wear a dedicated wrist bracelet with earth connection and transport the module in a plastic pocket made from anti-ESD material.
2. What you need:
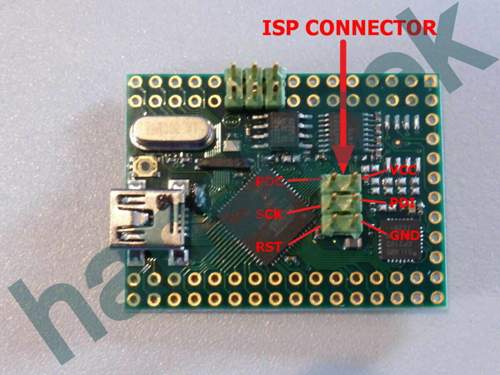
- AT90CAN128-board
- power board 5V
- additional fuse, VAG nr:
- printer headers
- jumper wires
- housing, soldering stuff etc.
I started this project with ordering the AT90CAN128-board and power board from www.chip45.com. Please specify the crystal frequency (16MHz) and ask to the pre-install the bootloader. You need the bootloader to load the Bronken-software from your PC of MAC to the AT90CAN128.
When the AT90CAN128 arrives you have to do some soldering. For the connection of the 4 wires I used 2.54mm headers; CONRAD art.nr: 737403–89 (single row, can be cut-off) and 737480–89 (2x3 pins). Two bridge connections must be made: J6 for the function of powering by USB (otherwise you need a separate power when programming it through USB and J8 is needed set the CAN signal to the VW CAN specification. The housing of the crystal must be soldered free from the board, it can be handy to use a piece of paper as distant keeper.
The connectors that I used that are so called jumper wires. I ordered a batch some years ago and use them a lot for electronic projects. I could not find the separate connectors on Conrad or Dealextreme. You can search on WWW.GIDF.DE (?) for ”Dupont Housing for Female Jumper Wires” or order them together with the CAN-module from Chip45.
On the power board also a bridge, 1-2, needs to be soldered to set the output at voltage 5V. Despite the advice to use a stepdown regulator I believe the AT90CAN128 module uses so little power that a lineair regulator as LM7805 could also do the job. In that case you have to solder something by yourself so the power module from Chip45 is anyway a good choice.
The CAN-module must be connected to the infotainment CAN so I decided to solder it to the wiring of my Bluetooth phone module. This is easy accessible underneath the passenger front seat. It doesn´t matter if it is the high or low type of telephone module, the required wiring and connector pin nrs. are the same, see pictures. Be aware of the CAN wires, they should be twisted to avoid interference. For the supply of power I made an extra fuse in space nr. 10 on the right hand side fuse box. The numbers 1-10 are contact-switched, as needed, small connector type, also pictures included.
3. Software
It was advised on Bronkens website to set the Fuse bytes. At first I did not know how to change these and something went wrong so I had to reflash the bootloader. If you need information about it, I will post separately after this one.
I used AVRDUDE to program the fuse bits (see second post). Possibly it can also be done with the USB program of Chip45? Can somebody please explain this?
The upload of the Bronken software to the module is pretty easy:
- Download and install chip45boot2
- Download and install driver CP2102
- Download the Firmware from www.bronken.de
- Connect the AT90CAN128 to the USB
- Start chip45boot2
- Upload the firmware (I used V0.6) to the AT90CAN128
- Press ‘start application’
- Disconnect USB
- The module is now ready to use
The bootloader is now overwritten by the Brinken-firmware and you can not modify the AT90CAN128 again with the Chip45boot2. Please see my next post if you want to repair the bootloader.
4. Results
The first time after I installed and powered it, the module it worked !!! The pictures show this module is also working in a red display. Unfortunately it the temperature hasn’t below 5 degrees so I can not test what happens
When I press the OK button on the steering wheel the green status LED on the AT90CAN128 module turns on or off.
If the module is active:
- the message ‘Fuel level too low – Auxilary heater not available’ when I press the instant heating – button on the clima panel.
- the green LED flashes on the remote control flashes after pressing start, as indication the heater doesn’t start
5. Recommendations
There is a green notification LED on the module. It is connected to pin nr. 17, called PB7, located opposite to CANL. It is switching to ground and can be used to control an external LED or something else to visualize to state of the module, maybe a sound.
Good luck everybody and have a wonderful 2015 !
Hans


53 Antworten
Nach deiner Anleitung zu Folge, kann ich bei meinem 3.6l Benziner, die Zuheizer Funktion per Diagnose ausschalten...
Heißt das jetzt das kann und macht jeder freundlicher?
Oder brauche ich hier jemanden mit Vcds Kenntnissen?
Oder kann ich das gar selbst?
Kann jeder Freundliche: ja. Technisch. Das Fachwissen dazu hat er meist nicht.
Vcds User: ja
Selber: ja mit vcds oder sonstigen diagnosesystemen
Hallo Bronken,
Ich möchte mich einen CAN platine bestellen zur unterdrücking für kurze fahrten.
Eine super lösung!
Wird es auch bei dem roten ki funktionieren?
gruss,
Hans
Die kann man nicht bestellen.
Ich habe mit Matthias das Teil entwickelt - Die dafür aufgebrachte Zeit und das investierte Geld schenken wir euch.
Ich habe die Software programmiert - könnt ihr selber runterladen, schenke ich euch.
Ich habe den Beitrag der Homepage verfasst, die Videos gemacht, die Schaltpläne gezeichnet, die Erklärungen geschrieben - schenke ich euch.
Bauen? Ne dafür ist es publik, das müsst ihr selber. Wenn ihr das nicht könnt, frag im Bekanntenkreis rum. NICHT MICH. Ich habe leider einfach keine Zeit dafür.
Bei der v0.6 ist das KI egal. Es wird eine neuere Software geben die dann nur noch auf neuen KI läuft (2009-heute, der B7 ist also komplett drin). Wer ein altes hat (2005-2008), kann ja weiter die v0.6 nehmen.
Ähnliche Themen
Hallo Bronken,
Dank für deine Antwort und sehr viel Dank für die Infos auf deine Homepage. Respect !
Und natürlich auch Dank für Matthias.
Sorry, ich hätte nicht richtig erzáhlt was ich meinte. 😕
Ich möchte selber so-ein Lösung basteln und mit ihre Infos und Software wird das gehen. Supertoll !!!
Mein Deutsch geht ein bisschen swierich, Sorry.
Freundlichem Gruss aus Holland,
Hans
Kannst du dir ja basteln. Alles was du an Anleitung brauchst sowie die Firmware gibt es komplett gratis auf bronken.de
Hello all,
This is my experience how to install the "Modul Zuheizer Standheizung Deaktivieren"
1. Introduction
First of all please excuse me for not posting in German. It is possible for me to read and understand but difficult to write. It would be also for you difficult to read if I did 😉
"A picture can express more than thousand words", so I uploaded some to illustrate this project.
I am very happy 🙂 to install the protection against unwanted starts of the auxiliary heater (Zuheizer). Many thanks to Bronken and his companions Matthias S. and Frank S. for the good work and explanation: http://www.bronken.de/zuheizer/
My Passat was made in april 2008, 2.0 TDI with motor code CBAB and has a red information display. It has an original auxiliary heater that I build in myself, with a B7/Golf 6 clima control unit:
-------------------------------------------------------------------------
Address 18: Aux. Heat Labels: None
Part No: 1K0 815 007 BH
Component: Standheizer 042 4404
Revision: 00042000 Serial number: 09011075000000
Coding: 0001012
Shop #: WSC 12345 123 56423
No fault code found.
-------------------------------------------------------------------------
Address 08: Auto HVAC (J255) Labels: 5K0-907-044.clb
Part No SW: 5K0 907 044 AM HW: 5K0 907 044 AM
Component: Climatronic 130 0305
Revision: 00002001
Coding: 0000000000
Shop #: WSC 00000 000 00000
ASAM Dataset: EV_Climatronic A01001
ROD: EV_Climatronic_VW46.rod
VCID: 76E9F801C9DC1C9
No fault code found.
-------------------------------------------------------------------------
For those who are not familiar with embed software and electronics I like share my experiences and I hope it will help.
Be carefull: To protect against ESD it is advised to wear a dedicated wrist bracelet with earth connection and transport the module in a plastic pocket made from anti-ESD material.
2. What you need:
- AT90CAN128-board
- power board 5V
- additional fuse, VAG nr:
- printer headers
- jumper wires
- housing, soldering stuff etc.
I started this project with ordering the AT90CAN128-board and power board from www.chip45.com. Please specify the crystal frequency (16MHz) and ask to the pre-install the bootloader. You need the bootloader to load the Bronken-software from your PC of MAC to the AT90CAN128.
When the AT90CAN128 arrives you have to do some soldering. For the connection of the 4 wires I used 2.54mm headers; CONRAD art.nr: 737403–89 (single row, can be cut-off) and 737480–89 (2x3 pins). Two bridge connections must be made: J6 for the function of powering by USB (otherwise you need a separate power when programming it through USB and J8 is needed set the CAN signal to the VW CAN specification. The housing of the crystal must be soldered free from the board, it can be handy to use a piece of paper as distant keeper.
The connectors that I used that are so called jumper wires. I ordered a batch some years ago and use them a lot for electronic projects. I could not find the separate connectors on Conrad or Dealextreme. You can search on WWW.GIDF.DE (?) for ”Dupont Housing for Female Jumper Wires” or order them together with the CAN-module from Chip45.
On the power board also a bridge, 1-2, needs to be soldered to set the output at voltage 5V. Despite the advice to use a stepdown regulator I believe the AT90CAN128 module uses so little power that a lineair regulator as LM7805 could also do the job. In that case you have to solder something by yourself so the power module from Chip45 is anyway a good choice.
The CAN-module must be connected to the infotainment CAN so I decided to solder it to the wiring of my Bluetooth phone module. This is easy accessible underneath the passenger front seat. It doesn´t matter if it is the high or low type of telephone module, the required wiring and connector pin nrs. are the same, see pictures. Be aware of the CAN wires, they should be twisted to avoid interference. For the supply of power I made an extra fuse in space nr. 10 on the right hand side fuse box. The numbers 1-10 are contact-switched, as needed, small connector type, also pictures included.
3. Software
It was advised on Bronkens website to set the Fuse bytes. At first I did not know how to change these and something went wrong so I had to reflash the bootloader. If you need information about it, I will post separately after this one.
I used AVRDUDE to program the fuse bits (see second post). Possibly it can also be done with the USB program of Chip45? Can somebody please explain this?
The upload of the Bronken software to the module is pretty easy:
- Download and install chip45boot2
- Download and install driver CP2102
- Download the Firmware from www.bronken.de
- Connect the AT90CAN128 to the USB
- Start chip45boot2
- Upload the firmware (I used V0.6) to the AT90CAN128
- Press ‘start application’
- Disconnect USB
- The module is now ready to use
The bootloader is now overwritten by the Brinken-firmware and you can not modify the AT90CAN128 again with the Chip45boot2. Please see my next post if you want to repair the bootloader.
4. Results
The first time after I installed and powered it, the module it worked !!! The pictures show this module is also working in a red display. Unfortunately it the temperature hasn’t below 5 degrees so I can not test what happens
When I press the OK button on the steering wheel the green status LED on the AT90CAN128 module turns on or off.
If the module is active:
- the message ‘Fuel level too low – Auxilary heater not available’ when I press the instant heating – button on the clima panel.
- the green LED flashes on the remote control flashes after pressing start, as indication the heater doesn’t start
5. Recommendations
There is a green notification LED on the module. It is connected to pin nr. 17, called PB7, located opposite to CANL. It is switching to ground and can be used to control an external LED or something else to visualize to state of the module, maybe a sound.
Good luck everybody and have a wonderful 2015 !
Hans
How to reflash a AT90CAN128
In my previous post I explained the installing of an AT90CAN128 with firmware of BRONKEN to disable the automatic function of the auxiliary heating (ZUHEIZER).
This firmware can be installed by a PC (or MAC) application “Chip45boot2” and is very easy to use by USB. The Chip45boot2 can only be used if there is a dedicated bootloader (pre)installed on your AT90CAN128. So after the Bronken firmware has been loaded on the AT90CAN128 you need something else to program it. For example if you need to flash a new revision or when things go wrong.
What do you need:
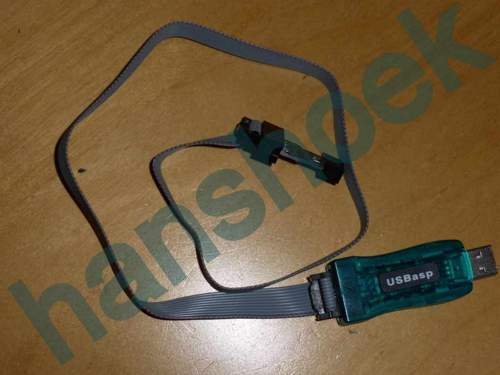
- ISP programmer with 6 pins connection, I used this one: ISP programmer on Ebay
- 6 PIN connection on your AT90CAN128
- Drivers for above, I used from: USB-ASP Drivers from Fischl
- Application to flash ; I used AVRDUDE, available from: AVRDUDE @ Non-GNU
- Bootloader image, to obtain from: Chip45
Procedure:
Extract the downloaded bootloader, it will contain many files. You must look for something like: chip45boot2_at90can128_uart0_v2.9Q.hex (especially the ‘0’ from uart0 is of importance, this is pointing to the USB). I copied and renamed it because you have to overtype it later 🙂😁.
Install the drivers and software and connect the ISP interface with the PC and the AT90CAN128. There should be some indication on the ISP connectiors, watch for it; they should match! No external power is needed, the ISP connection powers the AT90CAN128.
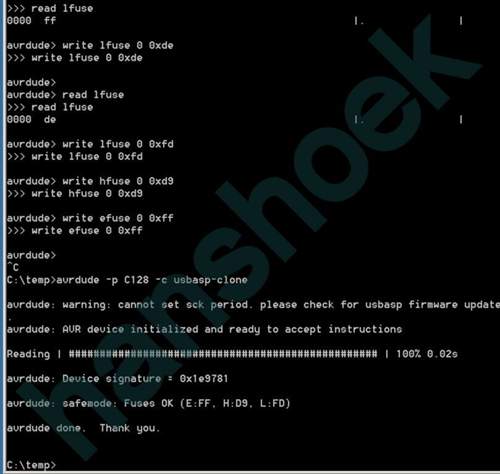
Now start the AVRDUDE application, from a DOS-command box. See screenshot how to set the fusebits and next screenshot how to flash (I renamed the hexfile to “chipboot.hex”).
After this the bootloader should be repaired. You can disconnect the ISP programmer and will be able to Chip45boot2 again bt USB.
Cheers.
Hans
Hallo
hat jemand das schon in einen Tiguan Benziner eingebaut?
Benziner braucht es nicht
Hallo
Danke für deine Antwort,
aber auch beim Benziner habe ich das Problem, das die Standheizung immer bei 4 Grad als Zuheizer läuft.
das möchte ich aber unterbinden.
Ja dann codierung Zuheizer ausschalten. Fertig.
Zitat:
@bernhard4108 schrieb am 15. Februar 2015 um 09:29:30 Uhr:
Hallo
Danke für deine Antwort,
aber auch beim Benziner habe ich das Problem, das die Standheizung immer bei 4 Grad als Zuheizer läuft.
das möchte ich aber unterbinden.
Ja, entweder auscodieren, oder wenn möglich, einen Schalter verbauen. Im Sharan nannte man das Taxischalter. Da wurde der Temperaturfühler mittels Schalter im Cockpit überbrückt. So konnte ich selbst entscheiden, wann der Zuheizer läuft, oder nicht.
Es gibt halt nur an der Sth selber keinen Temperaturfühler. Der bekommt die Temp vom Fahrzeug. Genauer dem KI.
Aber es gibt ja extra die Funktion das Zuheizen auszuschalten. Beim BENZINER. Warum also nicht nutzen
Zitat:
@bronken schrieb am 15. Februar 2015 um 12:10:06 Uhr:
Es gibt halt nur an der Sth selber keinen Temperaturfühler. Der bekommt die Temp vom Fahrzeug. Genauer dem KI.Aber es gibt ja extra die Funktion das Zuheizen auszuschalten. Beim BENZINER. Warum also nicht nutzen