Kühlwassertemperaturanzeige defekt
Moin,
habe folgendes Problem; meine Temperaturanzeige für´s Kühlwasser geht in der Amatur nicht. Ist ein analoger Zeiger, der auf Nullanschlag stehen bleibt. Da rührt sich gar nichts. Es handelt sich um einen Chevrolet G20 Van mit 5,7l TBI Maschine von ´89! Also der Sensor für´s Kühlwasser sitzt in der Spinne fast direkt neben dem Thermostat. Im kleinen Kreislauf. Habe den Sensor mal ausgebaut und den Widerstand gemessen und mit einem Funktionierendem aus meinem anderen G20 verglichen; passt. Kabel und Kontakte sehen auf´s Erste gut aus. Habe jetzt noch nicht so intensiv nachgeforscht, weil ich mal das Funktionsschema wissen müsste. Wie kann ich das jetzt am Einfachsten ausschließen? Also ob es am ECM oder am Amaturenbrett selber liegt? Klar, ich könnte mein anderes Amaturenbrett dort einbauen und gucken was passiert. Ich würde aber lieber messen und nicht einfach rumprobieren ;-) Kann da jemand was zu sagen? Gibt das ECM die Werte an das Amaturenbrett? Oder der Sensor direkt an´s Amaturenbrett? Habe leider (noch) keinen passenden Stromlaufplan.
11 Antworten
1989 Chevrolet G20 VAN
Submodel: |Engine Type: V8|Liters: 5.7
Fuel Delivery: FI|Fuel: GAS
Engine Coolant Temperature (ECT) Sensor Testing
ENGINE COOLANT TEMPERATURE (ECT) SENSOR
Description
The engine coolant temperature (ECT) sensor is a variable resistor that measures the temperature of the engine coolant. When the engine coolant temperature is low, the sensor resistance is high. When the engine coolant temperature is high, the sensor resistance is low. The Engine Coolant Temperature Sensor (ECT) input to the PCM is a primary input for calculation strategies, fuel delivery control and spark timing. The ECT is also used to determine loop status timer requirements (inside of PCM) and to support cooling fan operation. ECT failures can cause excessive rich conditions, increased injector pulse-width and retarded spark timing.
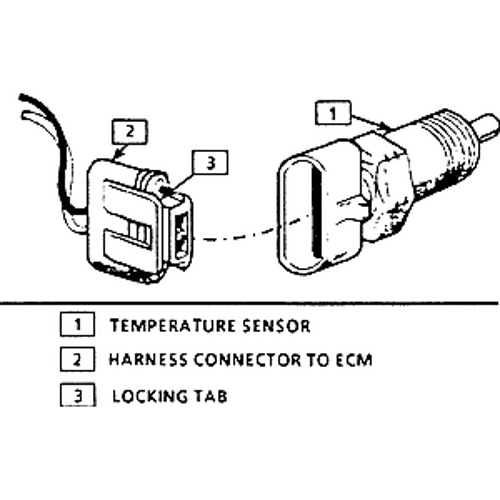
Typical Engine Coolant Temperature (ECT) sensor
Testing
Connect a scan tool to the data link connector (DLC) and check the datastream parameters for the ECT sensor. The ECT sensor temperature range varies between -40° F to 248° F (-40° C to 120° C). The ECT voltage range varies between 0V at 248° F (120° C) and 5V at -40°.
If the engine has been allowed to cool for an extended period the ECT and Intake air temperature (IAT) sensor should measure approximately the same values.
If the scan tool data for the ECT is not within the specified values perform a visual inspection on the sensor wiring harness, connector and related mechanical components as follows:
Ensure that the connector tabs are fully locked
Check for corroded terminals
Bent pins
Pins pulled back in the connector
Terminal cavities spread open
Harness damage
Cooling system
Thermostat
If the connectors, wiring harness and related mechanical components pass inspection, perform the following procedures to test the component, wiring and related modules.
Single Wire Sensor
Disconnect the ECT sensor connector.
Check the ECT sensor by performing a circuit resistance test. Use the Component Pin Data for circuit details. If the circuit is open, replace the ECT sensor. Otherwise, proceed to step C.
Check the ECT sensor for an internal short to ground to the sensor housing by performing a circuit resistance test between the sensor terminal and the sensor housing.
If there is continuity to the ECT sensor housing, replace the ECT sensor. Otherwise, proceed to step E.
Check the PCM signal circuit to the ECT sensor by performing a circuit resistance test. Use the Component Pin Data for circuit details.
Check the ECT sensor ground by performing a circuit resistance test between the ECT sensor and a known good ground.
Dual Wire Sensor
Disconnect the ECT sensor connector.
Check the ECT sensor by performing a circuit resistance test. Use the Component Pin Data for circuit details. If the circuit is open, replace the ECT sensor. Otherwise, proceed to step C.
Check the ECT sensor for an internal short to ground to the sensor housing by performing a circuit resistance test between the sensor terminals and the sensor housing.
If there is continuity to the ECT sensor housing, replace the ECT sensor. Otherwise, proceed to step E.
Check the reference high signal circuit between the ECT sensor and PCM by performing a circuit resistance test. Use the Component Pin Data for circuit details.
Check the sensor low signal circuit between the ECT sensor and PCM by performing a circuit resistance test. Use the Component Pin Data for circuit details.
Repair/replace defective parts as needed and recheck the scan data.
Dummerweise hab ich grad keinen Stromlaufplan zur hand
lol, und in den wirren des Netzes, noch diese etwas unzusammenhängenden Daten
Remove the ECT sensor from the vehicle.
Immerse the tip of the sensor in container of water.
Connect a digital ohmmeter to the two terminals of the sensor.
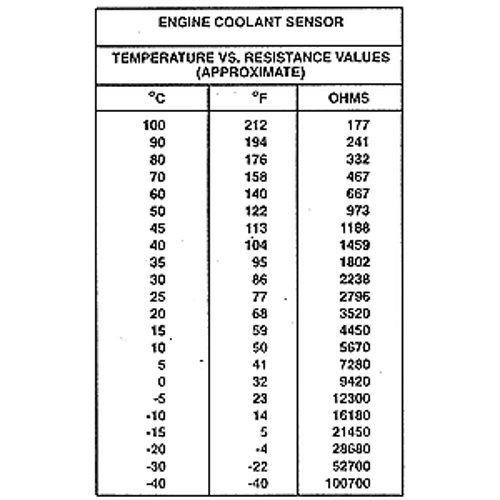
Using a calibrated thermometer, compare the resistance of the sensor to the temperature of the water. Refer to the engine coolant sensor temperature vs. resistance illustration.
Repeat the test at two other temperature points, heating or cooling the water as necessary.
If the sensor does not met specification, it must be replaced.
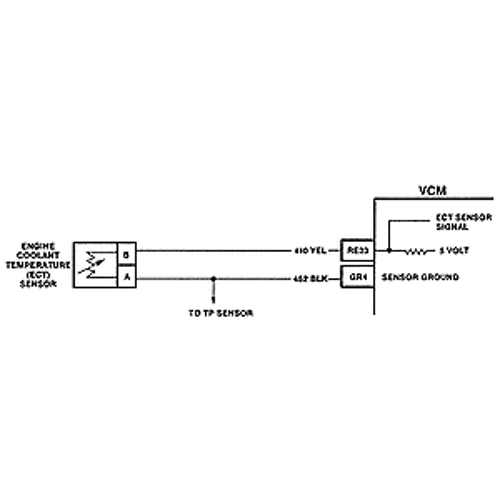
Fig. 1: Engine Coolant Temperature (ECT) sensor wiring diagram
Fig. 2: Engine Coolant Temperature (ECT) sensor temperature vs. resistance values
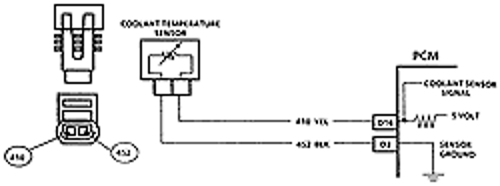
Fig. 3: Coolant temperature (CTS) sensor wiring diagram
Danke für die Info, Julian! Leider konnte ich den Fehler noch nicht finden. Die Widerstandwerte vom Sensor passen, die Anschlüsse sind sauber, es kommen 5V vom ECM an. Masseverbindung ist gegeben und der Sensor hat keinen innerlichen Masseschluss. Den Sensor schließe ich aus. Habe spasseshalber trotzdem den Funktionierden von meinem anderen G20 eingebaut. Zusätzlich das Dash Panel und das ECM. Die Anzeige geht immernoch nicht -.- Theoretisch kann es jetzt nur noch an irgendeinem Kabel zwischen ECM und Dash Panel liegen...
Kommando zurück! Habe gerade einen Stromlaufplan gefunden und gesehen, dass die Info für d. Temp.Anzeige nicht vom ECM kommt, sondern von einem eigenem Sensor. Sprich es gibt zwei Sensoren für Kühlwassertemperatur. Eins fürs ECM und einen für die Anzeige ;-) Bin in der Werkstatt!!!
Ähnliche Themen
Fehler gefunden(siehe Bild)! Allerdings steigt die Anzeige nur ganz leicht an... Das ist mir zu wenig Temperatur. Hatte zwar nur im Stand auf leicht erhöhter Drehzahl laufen aber normalerweise hätte die Temperatur höher sein müssen. Da muss ich nochmal nachforschen...
Vielleicht hat der ja keinen Thermostaten drin?
Wäre nicht das erste Mal, denn Fahrzeuge, die in warme Gegenden ausgeliefert wurden, hatten zumindest bei GM ab Werk (zumindest machmal) keinen drin.
Bei meinem ist es auch so. Der wurde in Californien zugelassen.
Aber der Fühler sieht auch aus, als könnte ein Neuer nicht unbedingt schaden.
So Rückmeldung: Fehler habe ich behoben. Das die Anzeige gar nicht ging, war der defekte bzw. stark verschmutze Sensor. Grund für den total langsamen Temperatutanstieg war das Thermostat. Habe ein Neues eingebaut und nun funktioniert alles wie es soll ;-)
Siehste? 😉
Auf jeden Fall Dank für die Rückmeldung.
Wenn das nur mehr machen würden.
Sicher hilft das Anderen bei Gelegenheit weiter. 🙂
Hallo ich habe das gleiche problem nur leider auch nicht soviel erfahrung mit so einem auto, darf ich dich mal fragen wo der andere sensor sitzt habe bis jetzt nur den t.sensor gefunden der neben dem thermos. sitzt gefunden.
mfg
Zitat:
Original geschrieben von Mr.Gigi81
Hallo ich habe das gleiche problem nur leider auch nicht soviel erfahrung mit so einem auto, darf ich dich mal fragen wo der andere sensor sitzt habe bis jetzt nur den t.sensor gefunden der neben dem thermos. sitzt gefunden.mfg
Jo, der für das Anzeigeinstrument liegt auf der Fahrerseite, sprich auf der linken Seite am Motor. Quasi zwischen dem 1. und dem 3. Zylinder SEITLICH in den Block geschraubt. Nähe der Zündkerzen und Abgaskrümmer. Eigentlich nicht zu verfehlen...
vielen dank für die schnelle hilfe dann werde ich da demnächst mal nachschauen ob es auch an den fühler liegt.